
Image file size for a website: what should a product photo weigh?

Type “image file size for website” into Google and the answers you get vary wildly. Most guides were written for bloggers or developers, not for someone running a shop with hundreds of product photos.
Below you will find a specific number, where it comes from, and how to get down to it without spoiling how your photos look. It comes down to two steps: shrinking the photo’s dimensions and saving it as WebP, a format developed by Google that is newer than JPG and usually produces lighter files at similar quality. We tested this on one photo, and we show you the result. We do not promise that switching formats will double your sales, because nobody can honestly promise that.
The short answer: about 130 KB per product photo
For a photo viewed on a product page, a sensible target is about 130 KB. A thumbnail in the product list can weigh up to a dozen or so kilobytes.
This is not a Google standard, or anyone else’s. There simply is no such standard. It is a practical compromise: below a certain point, a photo loses the details a customer wants to see, like the weave of a fabric, the grain of wood or the sheen of a glaze. Above it, you pay in loading time for details nobody will notice on a phone screen anyway.
Before you start, check where you are starting from. If your product photos weigh several megabytes each today, the gain will be large. If they weigh 200 KB each, it will be small.
Why image file size matters
Images are the biggest part of a typical home page. According to the HTTP Archive Web Almanac 2025, the median home page viewed on a phone weighs 2.56 MB, and the median total weight of the images on such a page is about 911 KB. That is roughly a third, and more than all of the page’s JavaScript code.
The second reason matters more for a shop. Google measures how quickly the largest element visible on the screen appears. This metric is called LCP. On 76% of pages viewed on a phone, that largest element is an image, and in a shop it is usually a product photo or a banner.
Google expects that element to appear within 2.5 seconds. Not in a single test, but in at least three quarters of real visits. It rates anything over 4 seconds as poor.
Will a faster site improve your Google ranking?
It may help a little, but less than many guides suggest. Google says its ranking systems use speed metrics. But it adds straight away that good scores do not guarantee a high ranking, and that a page with relevant content still beats a faster but less relevant one.
Speed counts most when several pages have similarly good content. The file format itself is not a ranking factor. Google does not reward an image for being in WebP format. Indirectly, it rewards a page that loads faster.
Be careful with the figures doing the rounds online, too. The popular claim that a one-second delay means 7% fewer conversions comes from a survey of more than 160 companies carried out by Aberdeen Group in 2008, not from measuring how shoppers behave. Do not base decisions on it.
Dimensions first, format second
This is where the most common mistake happens. Switching to WebP is the second thing to do, not the first.
A 12-megapixel photo from a phone is 4000 × 3000 pixels. Google Merchant Center, the dashboard shops use to send their products to Google Shopping, recommends product images of about 1500 × 1500 pixels. That is a sensible reference point for your own shop too.
If your shop sends a file bigger than the space the photo takes up on screen, the browser will scale it down anyway, but it has to download the whole file first.
We tested it on one photo
We took a product photo — a ceramic mug on a plain background — and saved it four ways. We chose it on purpose: the saturated orange and the smooth gradient in the background are the places where compression easily leaves marks. In terms of file size alone, though, it is an easier case than a photo from a camera.
| Version | Dimensions | File size |
|---|---|---|
| Original JPG | 2880 × 2880 px | 1,826 KB |
| Resized only, still JPG | 1500 × 1500 px | 550 KB |
| WebP only, full dimensions | 2880 × 2880 px | 128 KB |
| Resized and saved as WebP | 1500 × 1500 px | 122 KB |
Resizing alone cut the file size by 70%. Saving it as WebP with a 130 KB target then made it more than four times smaller again. Altogether, the photo is fifteen times lighter than the original.
That second reduction is not down to the format alone, though. The resized JPG still had a quality setting of 95, and the plugin compressed the WebP harder to fit it into 130 KB. How much the format itself saves is covered further down.
Comparing the last two rows tells you the most. Both versions weigh almost the same, but they are not equally good. Quality is set on a scale of up to 100, and the lower it goes, the more fine detail disappears. To fit the full-size photo into 130 KB, the plugin had to lower the quality to 55. The resized photo fitted into the same 130 KB at quality 87, and according to our measurement, compression distorted it less. That is exactly why dimensions come before format.
We ran the test on 13 September 2026 with our ConverterSEO 1.31.1 plugin, set to a 130 KB target, on a server running WordPress 7.1 with the GD graphics library. The mug photo did not come from a camera: we generated it specifically for this test and saved it as a JPG at quality 95. Real camera photos have more noise and usually weigh more, so your numbers will come out different. What counts is the direction: dimensions first, then format.
Does WebP reduce image quality?
A little, yes. WebP as used for photos is a lossy format, so it always throws something away when it saves a file. Guides, and even Google itself, use the phrase “without loss of quality”, but behind it is a comparison in which an algorithm judged the quality of both files. It does not mean the file lost nothing. Lossless compression is rarely used for product photos, because the files then come out many times larger.
With sensible settings, though, the difference can be very small. Here is the same part of the mug from our test in both versions.
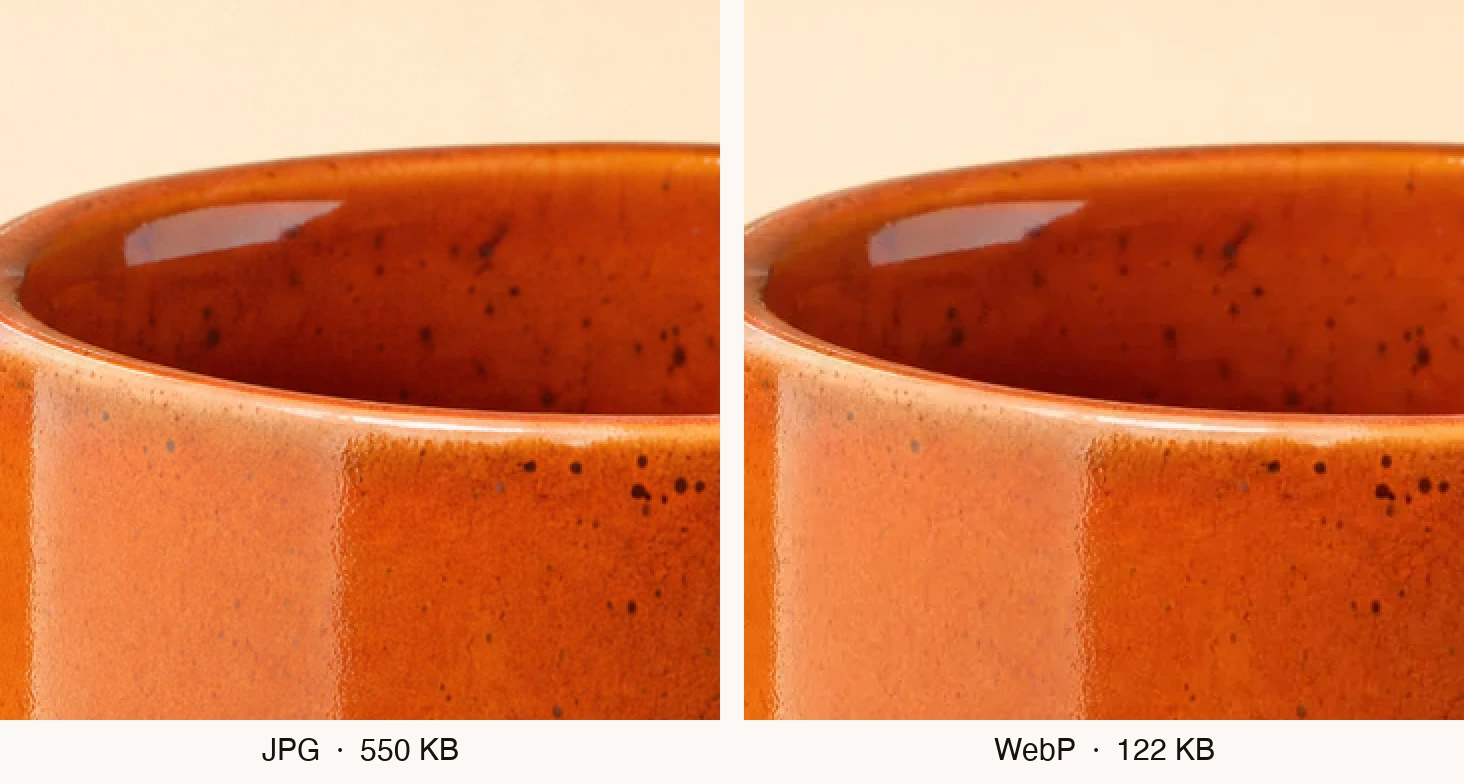
A pixel-by-pixel comparison shows that the WebP differs from the original slightly more than the JPG on the left. On screen, even zoomed in, the difference is hard to spot. The specks in the glaze, the highlight and the edge of the mug are all still where they were.
It pays to be careful in two cases:
- Smooth colour transitions, such as the background of a studio shot. If the compression is too strong, bands can appear instead of a smooth gradient.
- Very high quality. Here WebP struggles to match JPG, so the file will not always come out smaller.
Before you convert every photo in your shop to WebP, try it on a few and look at them zoomed in, next to the originals. Start with the ones that have a smooth background and strong colour.
WebP or JPG: how much you really save
In its study, Google reported that WebP is 25–34% smaller than JPG when an algorithm rates the quality of both files as the same. That is true, but with a catch that guides usually leave out. The test was run around 2011, and it compared WebP with JPGs saved by an old tool that, at the same quality, produces bigger files than newer tools do.
A more recent analysis by Cloudinary, from 2023, gives a fuller picture. At lower quality settings, WebP is 25–35% smaller than a JPG saved without optimisation, and at higher settings that advantage shrinks. Against a JPG saved with a modern tool that squeezes files hard on its own, such as mozjpeg, it is only 3–5% smaller.
What does that mean for you? If you upload photos straight from the camera, the gain will be clear, but largely thanks to smaller dimensions and stronger compression, not the format itself. If someone has already compressed your JPG files properly, changing the format alone will do little, and you will gain more from resizing.
There is also the newer AVIF format. In the same Cloudinary analysis it came out about 10–15% smaller than WebP, but at default settings it took about ten times longer to save. For a shop with thousands of photos, that is a real difference.
Where you can send WebP, and where you cannot
A product photo does not only end up in your own shop. You also send it to eBay or Etsy, to Google Shopping, and sometimes to Amazon. WebP will not get through everywhere.
| Where | Does it accept WebP? |
|---|---|
| Your WordPress shop | Yes, from version 5.8, if your server supports WebP |
| Google Merchant Center | Yes |
| eBay (ebay.com and ebay.co.uk) | Yes, when you add photos in the listing form. eBay’s help page gives no separate format list for bulk listing tools or the API. |
| Etsy | No: Etsy lists .jpg, .gif, .png, .svg and .heic as the only image file types it supports |
| Amazon | Probably not: it was not on the list of allowed formats (as of 2024) |
| Importing products into WooCommerce from a CSV file or from another program | Yes, from version 7.7 |
That gives you a simple rule: keep your original photos as JPG or PNG, and use WebP on your shop’s website. Do not convert the only copy you have.
Will your customers’ browsers support WebP?
Yes. According to Can I Use, based on data from August 2026, about 97% of browsers in use worldwide fully support WebP.
Safari has supported WebP since version 14, released in September 2020 alongside iOS 14. On Mac computers, though, it only works from macOS 11 Big Sur onwards. So the line “Safari does not support WebP”, which still turns up in older guides, has been out of date for years. Google Search also officially supports WebP images.
What WordPress will do for you, and what it will not
Since version 5.8, released in July 2021, WordPress has let you upload WebP images to the media library, as long as your server supports the format. It will not convert your JPG or PNG files by itself, though. In 2022 there was an attempt to add automatic WebP creation from uploaded JPG files to version 6.1, but the change was reverted before release.
You can check in your WordPress admin whether your server can save WebP: Tools → Site Health → Info → Media Handling. Look for the rows “GD supported file formats” and “ImageMagick supported file formats”. If either of them shows WEBP, you are all set.
The photos already in your shop will stay in their old format until you do something about them. There are two ways to go.
- Single photos can be converted for free in the WebP converter. It works in your browser, so your files are not sent to any server.
- All your photos at once are a job for the ConverterSEO plugin. It compresses them on your shop’s own server, just once: when a photo is uploaded, or when you tell it to process the photos already in the library. Never while a customer is visiting.
One important note. After compression, the plugin replaces the file in the media library with the WebP version and deletes the original. If WordPress is the only place you keep your original photos, make a copy before you start, for example by downloading the wp-content/uploads folder to your computer through the file manager in your hosting control panel.
How to tell whether it is worth it
Run PageSpeed Insights on a product page and on a category page. If the tool does not point to any images to improve, the gain from WebP will be small.
Judge the result by data from real visits, not by a single measurement, because any one test comes out better one time and worse the next. PageSpeed Insights shows this data at the top of the report if the page gets enough visits. Google checks whether a page loads quickly in at least three quarters of real visits.
And one thing that is easy to get wrong. Lazy loading holds off downloading an image until the customer scrolls down to it. Do not turn it on for the main product photo. Google explicitly advises against this, because that kind of loading delays the appearance of the most important element on the page. Lazy loading makes sense for images further down.
Where to start in your shop
- Check how much your product photos weigh and what dimensions they have: in the media library, click a photo and read the “File size” and “Dimensions” fields.
- Resize them to about 1500 pixels, the size Google Merchant Center recommends for product images.
- Save them as WebP so that they weigh about 130 KB.
- Look at a few of them zoomed in, especially the ones with a smooth background.
- Keep the JPG originals for Etsy and Amazon.
- Judge the result by real visits, not by a single test.
If you only have a few photos, the free WebP converter is enough. If you have hundreds, the ConverterSEO plugin will process them all at once, and its WebP compression is free and unlimited. If you want the same photos to have good filenames and descriptions as well, read our article on how to prepare images for SEO.